Quick answer: Free name tracing worksheets are printable sheets with a child's name in dotted letters to trace over, one letter at a time. This guide shows you how to set one up in minutes, which letters to teach first, how to hold the pencil, and a practice plan — plus what to do when letters come out backwards or wobbly.
Free Name Tracing Worksheets: How to Teach a Child to Write Their Name
Free name tracing worksheets are printable sheets with a child's name in dotted letters to trace over, one letter at a time. This guide shows you how to set one up in minutes, which letters to teach first, how to hold the pencil, and a practice plan — plus what to do when letters come out backwards or wobbly.
There is a moment every parent remembers: the first time a child writes their own name and holds it up like a prize. It is wobbly, the letters lean in different directions, and it is the best thing on the fridge for a week. That moment does not arrive by accident. It arrives after a few short weeks of tracing dotted letters, one careful line at a time. This guide walks you through those weeks. No app, no account, no special kit. Just a printed sheet, a pencil, and ten minutes a day. And when the tracing is done, the Kids Coloring & Activity Pack gives the same small hands something calm to do next.
What are free name tracing worksheets?
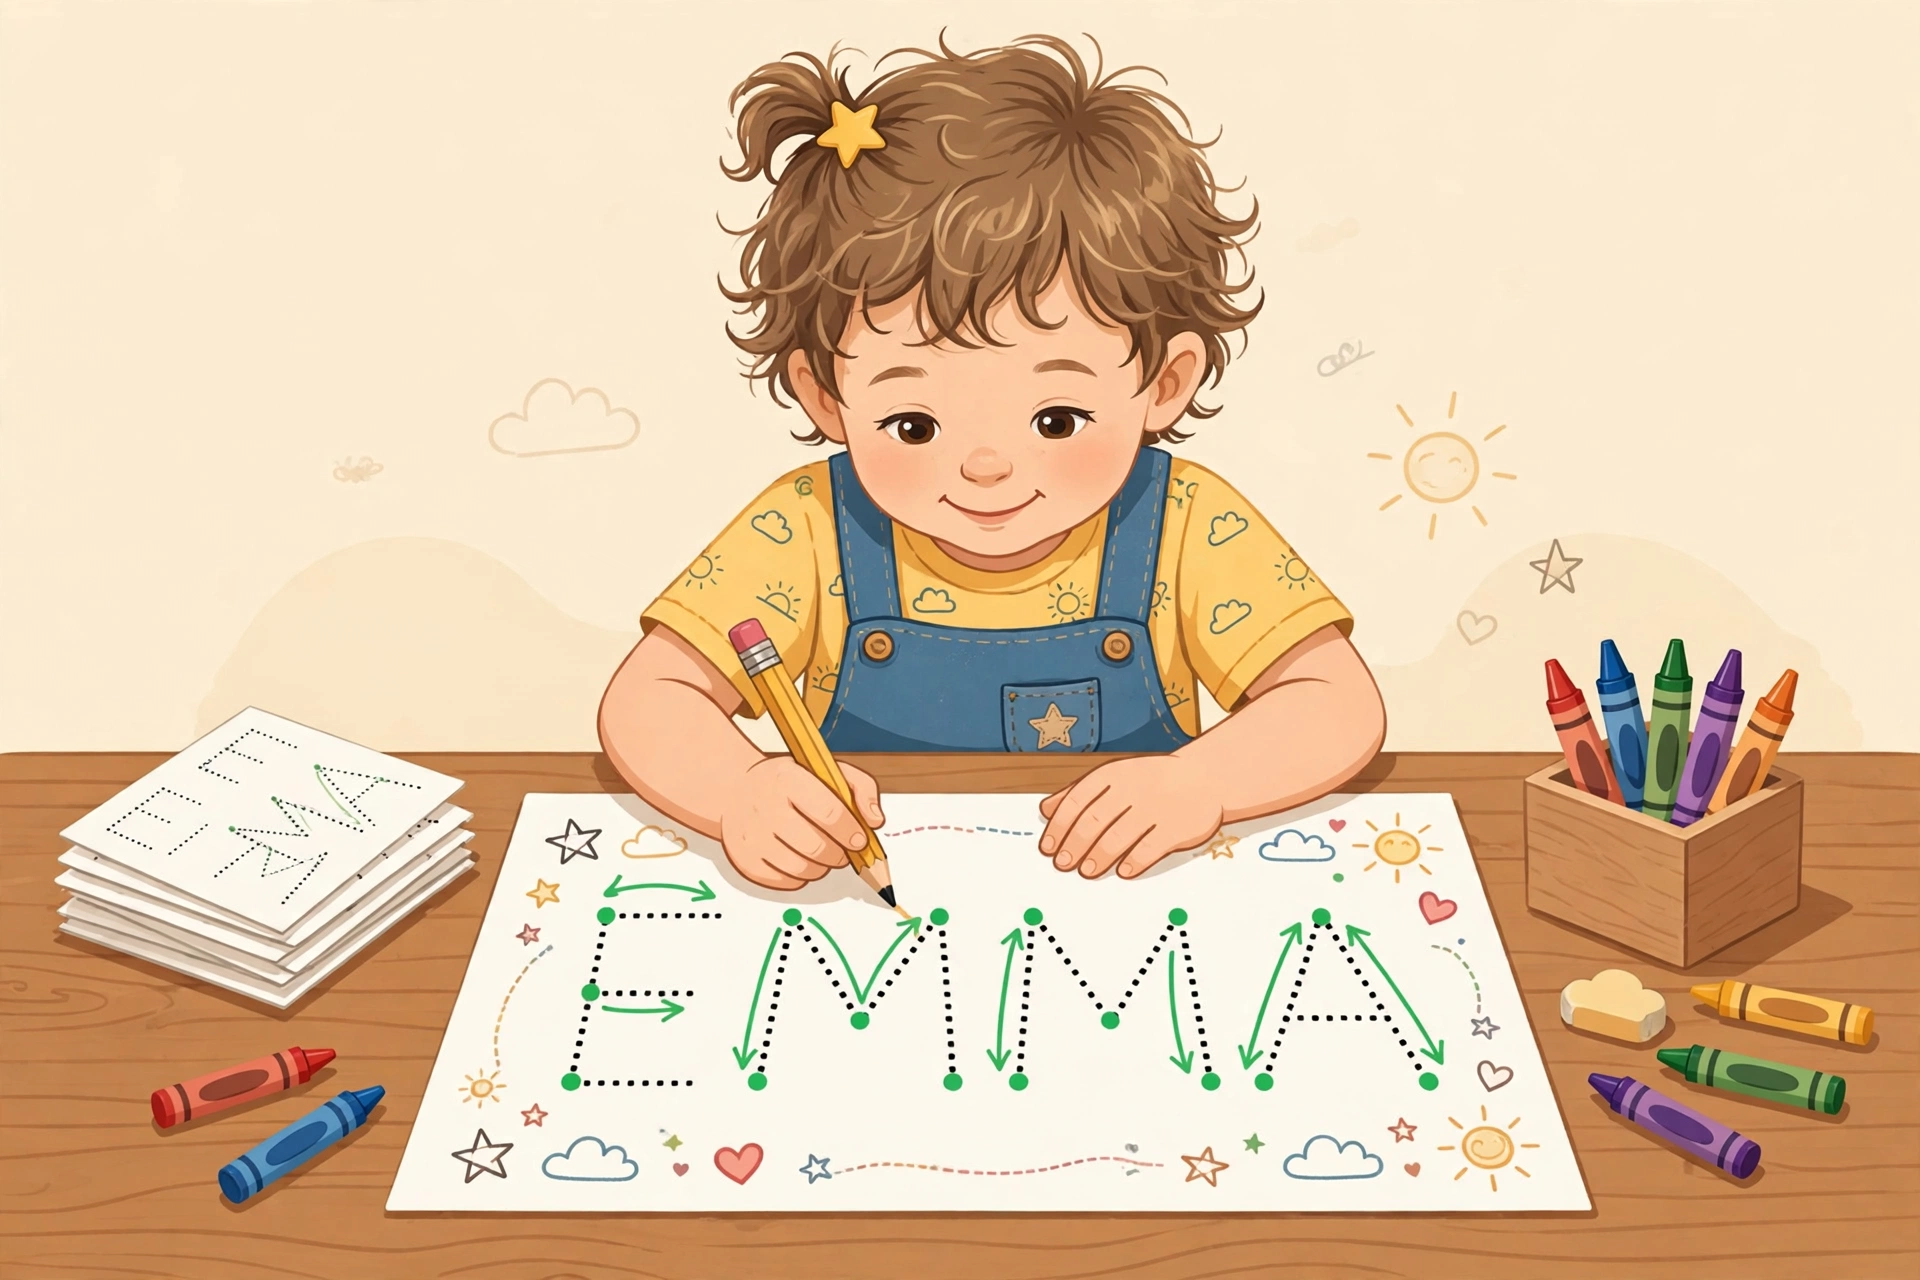
A name tracing worksheet is a printable sheet with a child's name in dotted letters to trace over, one letter at a time. Each letter is drawn in dots or faint gray lines. The child follows the dots with a pencil, learning the shape of each letter and the order the lines go in. The sheet usually has the name printed three or four times, so the child gets several tries on one page, and a space at the bottom to try writing the name without the dots.
MerryHub is a printable-games and planner shop by ReplyPilot.
The timing is worth knowing. The CDC lists "writes some letters in her name" as a milestone most children reach by five years, on its Milestones In Action page for five-year-olds. The same page lists a second milestone that shapes how you should practice: a five-year-old "pays attention for 5 to 10 minutes during activities", as the CDC's 5-year online milestone checklist puts it. Those two numbers set the whole plan for this guide: aim for a few letters by five, and keep each session inside ten minutes.
One thing to settle before you start: whose name goes on the sheet? The child's own name, always. A child cares about their own name in a way they care about no other word. It is the first word most children want to write, and the first word they learn to read.
When is a child ready to trace their name?
Most children are ready between three and five, but the age matters less than the signs. Look for these four, and start when you see two or three of them.
The first sign is interest. The child points at their name on a door, a bag, or a birthday card. They ask what the letters say. They try to copy a letter on their own, even if it comes out as a squiggle. A child who wants to write their name will practice without being asked.
The second sign is a steady grip. The child can hold a crayon or a chunky pencil and make marks on purpose, not just scribble. The marks do not need to be neat. A child who can draw a line from one side of the paper to the other can start tracing.
The third sign is letter knowledge. The child knows some letters by name, even if it is only the first letter of their name. A child who knows that M is for Mia has a hook to hang the tracing on. If your child knows no letters yet, spend a week on letter names first, and start tracing after that.
The fourth sign is sitting still for a few minutes. If your child cannot sit for five minutes yet, wait a month and try again. Pushing a child who is not ready teaches them that writing is a chore, and that lesson is hard to undo.
If your child is four or five and shows none of these signs, that is not a reason to worry on its own. Children develop at different speeds. The CDC's milestone checklists describe what most children — 75% or more — can do by each age, which means a quarter of children do it later, and that is normal. If you are worried, the right step is a chat with your child's doctor or teacher, not a harder worksheet.
And if your child is already writing their name without the dots, you do not need tracing sheets at all. Move on to writing the name from memory, and then to writing it in a sentence. Tracing is a bridge, not a destination.
How do you set up a name tracing sheet?
You can make a good tracing sheet in five minutes with a word processor and a printer. Here is the setup that works, step by step.
First, type the name in capital letters for the first letter only, and lower-case letters for the rest. Mia, not MIA, and not mia. This is the way names are written in real life, and it is the way your child will write their name at school. A child who learns MIA has to unlearn it later.
Second, pick a clear, simple font. The letters should look like the letters your child sees in books. Avoid fancy fonts with curly tails or unusual shapes. A plain rounded font is best. If your word processor has a dotted-line font, use it for the tracing letters. If it does not, type the name in a light gray color, and the child traces over the gray.
Third, make the letters big. Each letter should be at least as tall as your child's thumb. Small letters are hard to trace, and a child who has to squeeze their hand into a small space gets frustrated fast.
Fourth, add a start dot and a small arrow to each letter. The dot shows where the pencil starts. The arrow shows which way the line goes. A child who starts a B from the bottom builds a bad habit that is hard to break. A dot and an arrow fix the habit before it forms.
Fifth, print the name three times down the page, with space between each row. Three rows is enough for one session. More than that, and the page starts to look like work. Leave a blank line at the bottom with no dots, so the child can try the name on their own when they feel brave.
That is the whole setup: right case, clear font, big letters, start dots, three rows. Print one sheet, try it, and change one thing if it does not work. The sheet is a tool, not a test.
Which letters should you teach first?
Do not teach the name in order, from the first letter to the last. That sounds strange, but it works better. Teach the easy letters first, and save the hard ones for later. The child builds confidence on the easy ones, and the hard ones feel less hard when they arrive.
Here is the order I use, which I call the name ladder. It sorts the letters of a name into three rungs, and the child climbs one rung at a time.
Rung one is the straight-line letters: I, L, T, E, F, H. These are made of straight lines only, up and down and across. A child who can draw a line can make these letters. If your child's name has one of these, start there.
Rung two is the round letters: O, C, S, U. These need curves, but the curves are simple and forgiving. A wobbly O is still an O. These come next, once the straight lines feel easy.
Rung three is the tricky letters: A, B, D, G, J, K, M, N, P, Q, R, V, W, X, Y, Z. These mix lines and curves, or they need the pencil to change direction halfway through. Teach these last, one at a time, with the start dot doing the guiding.
Take the name Mia. M is rung three, I is rung one, A is rung three. The ladder says: teach I first, then A, then M. The child learns the middle letter first, and that is fine. The name does not care which letter was learned first. It only cares that all three are learned.
Work on one letter at a time, and do not move on until the child can trace it without the dots. That sounds slow, and it is. A name with five letters takes two weeks at this pace, not two days. But a child who learns five letters properly keeps them.
How should a child hold the pencil?
A good grip makes tracing easier, and a bad grip makes it harder for no reason. The grip to aim for is the tripod grip: the pencil rests between the thumb and the first two fingers, with the hand relaxed and the wrist straight.
Most children do not start with a tripod grip, and that is normal. A three-year-old often holds a pencil in a fist. A four-year-old often holds it with four fingers. Both are fine for now. The grip settles as the hand gets stronger. What matters is that the grip does not hurt, and that the child can see what they are writing.
A chunky pencil helps. A normal pencil is thin, and a small hand has to squeeze hard to hold it. A chunky pencil, or a pencil with a soft grip, needs less squeezing. Crayons work too, and they are more forgiving than pencils, because a crayon makes a mark even with a light touch.
Sit the child at a table with both feet on the floor. The paper should be straight in front of them. Tilt the paper slightly for a left-handed child — about twenty degrees to the right — so the hand does not cover the letters as it moves.
And keep the sessions short. A child who is gripping too hard will get tired fast, and a tired hand makes wobbly letters. If the letters start to slide downhill after five minutes, the hand is tired. Stop, and come back tomorrow.
What does the 2-week practice plan look like?
Two weeks, five days a week, ten minutes a day. That is the whole plan. It is built around the name ladder from the last section, and it assumes a five-letter name.
Days one and two are for the easy letters. Trace the rung-one letters in the name, three times each, on one sheet. Say each letter out loud as the child traces it. "L. Down, across, down." The talking matters.
Days three and four add the round letters. Trace the rung-two letters, then go back and trace the rung-one letters again, so the easy ones stay fresh.
Day five is a review day. Trace the whole name, slowly, top to bottom. Do it twice. Then let the child try one letter without the dots, on the blank line at the bottom of the sheet. If the letter comes out right, that is a win worth celebrating. If it does not, that is fine too. The dots are still there for next week.
Week two starts with the tricky letters. Days six and seven are for one tricky letter at a time. Trace it slowly, with the start dot and the arrow doing the work. Talk through it. "B. Down, around, around." A tricky letter takes two days, not one.
Days eight and nine put the name together. Trace the full name, three times, on one sheet. The child will be slower on the tricky letters and faster on the easy ones, and that is exactly right.
Day ten is the test, and it is a kind one. Ask the child to write their name on a blank sheet, with no dots. Stand back and watch. Most children get most of it right by day ten. The letters may lean, the spacing may wander, and the last letter may fall off the line. None of that matters. A name written without dots is a name learned.
If day ten does not work, do not worry, and do not repeat the whole plan. Go back to the one letter that went wrong, and spend two more days on it. Then try again. Some names take three weeks. The plan is a guide, not a deadline.
What if the letters come out backwards?
A backwards letter is the most common worry parents bring to this, and it is the one that needs the least worry. A child who writes a backwards B, or a D facing the wrong way, is not doing anything wrong. They are learning. Young children often flip letters because they have not yet settled which way each letter faces. It usually sorts itself out as the child reads and writes more.
The fix is gentle, not forceful. When a letter comes out backwards, do not rub it out and make the child do it again. That teaches the child that writing is about getting it wrong. Instead, point at the letter and say, "Look, this one is facing the other way. Let's trace it together." Trace it once, slowly, with the start dot and the arrow. Then let the child try it again on the next row.
A trick that helps with the worst offenders, b and d, is to give each one a picture. B has a line and two bumps. D has a line and one big bump, like a door. Or use hands: hold up two fists with the thumbs up, and the left hand makes a b shape while the right hand makes a d shape.
And here is the question that usually comes next. Once the name is written, what does the child read? A name is one word. Reading needs many words, and the words a child meets most often are the ones that unlock real books. Our sight words worksheets take the same short daily routine and apply it to reading: the 100 words that make up about half of what a child sees in print, sorted by grade, with tracing, matching and game pages. Writing the name is the first step. Reading the words is the next one.
If the backwards letters keep happening after months of practice, or if your child is seven or older and still flipping most letters, mention it to their teacher. A teacher sees a hundred children a year and knows what is usual at each age.
What if the lines are wobbly?
Wobbly lines are not a problem to fix. They are a sign that the hand is still learning its job. A young child's hand muscles are small and new, and holding a pencil steady is hard work for them. The lines will straighten out as the hand gets stronger.
The best help for wobbly lines is not more tracing. It is play that builds hand strength. Squeezing playdough, picking up small objects with tweezers, threading beads, cutting paper with child scissors, building with small blocks — all of these build the same muscles that hold a pencil.
A few practical things help too. Make sure the pencil is not too long. A full-length pencil is heavy for a small hand, and the weight pulls the lines down. Break the pencil in half, or use a short chunky one. Check the paper is not sliding around. A sheet that moves under the hand makes wobbly lines no matter how careful the child is.
And keep the sessions inside ten minutes. The CDC's milestone guidance says a five-year-old pays attention for 5 to 10 minutes during activities, and that number is a useful limit for tracing too. After ten minutes, the hand is tired, the lines get wobblier, and the child starts to hate the page. Stop while the lines are still good.
What are fun ways to practice beyond the sheet?
A worksheet is one way to learn a name. It is not the only way, and for some children it is not the best way. A child who hates sitting at a table may love writing their name in the air, in sand, or on a steamed-up window. The letters are the same. Only the surface changes.
Try chalk on the pavement. Big letters, a whole arm to draw them.
Try building the letters with playdough snakes. Roll the dough into long thin ropes, and bend them into the shape of each letter. A B made of dough is a B the child has built with their hands, and that kind of knowing lasts.
The point of all of these is the same: the name is learned by the hand, not just by the eye. A child who has traced a letter in sand, drawn it in chalk, and built it from dough knows that letter in a way no worksheet alone can teach. Use the sheet for the careful practice, and use the play for the joy. Both count. When the hands need a rest, our printable coloring pages for kids keep them busy.
How do you print and reuse the sheets?
Print at actual size, not "fit to page". Fit-to-page shrinks the letters, and small letters are hard for a young child to trace. Choose 100% if the sheet offers a print setting.
Use plain white paper and black ink. Colored paper makes the dotted lines harder to see, and color ink costs more without adding anything to a tracing page.
Print one sheet at a time, not a whole pack at once. A stack of twenty identical sheets on the table looks like a chore. One sheet for today looks like a small job.
If a sheet will be used more than once, slip it into a clear plastic sleeve and hand your child a dry-erase marker. The same sheet works ten times over, and the child likes wiping it clean and starting again. This is the cheapest way to reuse a worksheet.
Keep the finished sheets in a folder with the date on each one. After two weeks, you can flip through the folder with your child and show them the first wobbly attempt next to the latest steady one.
Where should you go next?
You have the setup, the letter order, the grip, and a two-week plan that fits into ten minutes a day. The next step is reading. A child who can write their name has learned one word. The words a child meets most often in books are the ones that turn a name-writer into a reader. Our sight words worksheets carry the same short daily routine into reading: the words sorted by grade, six kinds of practice page, and a plan that takes ten minutes a day.